fbpx

Monday Morning Art School: color harmony

Color harmony is not just a question of placing or finding objects that look good together; it means using those colors within your painting to build a great composition.

Rachel Carson Wildlife Refuge, by Carol L. Douglas
Nearly all beginning painters focus primarily on matching local color. That’s an important skill, but it is just a bare beginning. To make paintings sing, one must think carefully about color schemes. Sometimes a subject can achieve color harmony naturally, but most of the time we need to think through our color choices and placement.
In painting, local color means the natural color of an object, unmodified by lighting. Leafy trees are green, for example. But there are circumstances where they can appear black (at sunset, for example), golden or even orange. There are other circumstances in which, for compositional purposes, it is better to paint them blue or lavender. The rookie error is to persist in what we know—that trees are green—instead of what we see or would be more visually appealing.
Self portrait, by Tom Root. Courtesy of the artist.
Colin Pageis a master of color harmony; I encourage you to study his work. Above is another excellent example, a recent self-portrait by artist and teacher Tom Root. He’s a fabulous portrait painter; I’d take a workshop from him, if we ever get to take workshops again.

I could go on and on about the virtues of this painting, which are legion. For now, I’ll talk about his color use.

Isolated colors from Tom Root’s painting, above.
The background and shirt are tied together in a tight arrangement of blues and greens. The face and jacket, meanwhile, are equally tightly-grouped. Photoshop allows me to check the inverse of any color. The blue-greens and flesh tones are almost exact complements, making this a classic complementary color scheme. These complements are arranged in a pleasing, slightly asymmetrical triangle. Tom’s drawing, in a blue-violet, stands outside this color scheme, giving it great impact.
Monochrome reduction of Tom Root’s painting above.
Tom uses hue as much as value to model. (If you need a refresher on what this means, see here.) That gives his painting a solid contemporary feel. But that doesn’t mean he uses no value. In fact, if you look at the monochrome reduction of the painting, you’ll see a beautiful sweep of darks from the bottom left to the upper right. That creates contrast to drive our eye to the most important part of his painting: the face.
I didn’t ask Tom how he arrived at this color scheme; By the time you’re at his level of expertise it’s intuitive. But it doesn’t start off that way. To master color harmonies, you must spend a great deal of time thinking about color and practicing it.
All color schemes rest in the standard 12-color wheel that’s been kicking around for centuries. I’m a fan of the Quiller Wheel because it’s based on paint pigments, but you can just as easily make your own. That gives you the advantage of understanding the paints you’re actually using. (Many store-bought wheels are overloaded with useless information, making them more trouble than they’re worth.)
Tinfoil hat, by Carol L. Douglas. Remember, the color scheme shouldn’t be primarily about the objects, but about how you use the colors in your painting.
Here’s a linkthat gives you a complete description of the classic color harmonies, but let’s review them here:
Complementary
These are colors that lie opposite each other on the color wheel. The most famous example is Christmas’ red and green.
Analogous
Analogous color schemes use colors that lie next to each other on the color wheel. Using analogous colors can make what might be a garish scene (a sunset, for example) more serene.
Peppers, by Carol L. Douglas. Every once in a while I paint something very realistic, just to remind myself that I know how.
Equilateral Triad
This uses colors that are evenly spaced on the color wheel. The most well-known example is the primary combination of red-blue-yellow.

Harmonic triads

This variation counts 3-4-5 in either direction on the color wheel. Start with a key color, and count from there. This is a sophisticated variation on the equilateral triad.

Split-Complementary

This is a variation of complementary colors. It either substitutes for the complement or includes the complement’s adjacent hues.

Double complements

The rectangle or tetradic color scheme uses four colors arranged into two complementary pairs. The colors can be in a rectangle or in a square.
As nice as that information is, color cannot be learned from reading, but only through trial and error. Your assignment this week is to set up a small still life in one of these color schemes and paint it, paying careful attention to how the lighting unifies the scene.  Remember, it’s not just a question of placing objects in a pleasing array; it’s a question of using colors within your painting to make a great composition.

Monday Morning Art School: painting evergreens

Your assignment this week is to paint an evergreen, using one of the great masters as your muse.
Herdsmaid, 1908, Anders Zorn. You could identify the species of trees in this painting, but it’s short on detail.

Last week, I wrotethat there are as many ways to paint water as there are moments in the day. The same is true of painting evergreens.

We can look to the painters of the great northern landscapes for guidance on evergreens. Swedes Bruno Liljefors and Anders Zorn, Tom Thomson and the Group of Seven, the Russian Peredvizhniki, and the northeastern painters from Winslow Homer to Andrew Wyeth are all worth studying.
Winter landscape at dawn, 1900, Bruno Liljefors. If the evergreens are in a supporting role, they’re often painted as a single mass.
Spend an hour searching their work on the internet along with the key words “spruce,” “pine”, or “evergreen.” You’ll notice that most of these artists handled the subject differently depending on whether they were in the studio or painting en plein air, or if the trees were the main subject or incidental.
After the bath, 1895, Anders Zorn, courtesy Nationalmuseum. The evergreens are nothing more than a few brushstrokes, but they’re perfectly realized.
Anders Zorn often used evergreens behind his pulchritudinous nudes. The contrast between his perfectly-observed trees and cookie-cutter models is striking. The Herdsmaid (1908) is probably the best evergreen painting ever executed. It’s all about the young trees, but Zorn never overstates the detail. Instead, he allows his brush to wash softly over the darker background, suggesting the softness of pine needles.
That apparent artlessness rests on a solid ground of observation. Zorn (and Wyeth) were able to be specific but loose because they drew and observed endlessly from nature. Each species of tree has a specific design. There are no shortcuts to knowing and understanding them. If you want to be able to paint trees, you must first draw them—a lot. Observe their branching structure, their needles or leaves, their bark, and where they like to grow.
Spruce Gun, watercolor, 1973, Andrew Wyeth, private collection
But trees are also forgiving; when you understand their structure, you can fearlessly mess with their form. While Wyeth’s tree in Spruce Gun looks perfectly natural to us, it’s also stylized to give a dynamic boost to the gun.
North Woods Club, Adirondacks (The Interrupted Tete-a-Tete), watercolor, 1892, Winslow Homer, courtesy Art Institute of Chicago. The trees are simple silhouettes, but they work because they’re accurate.
Either watercolor or oil are perfect for the organic character of trees; they can be schooled into great detail or allowed to wash with great softness across the canvas or paper.
It’s easy to become overwhelmed with detail in a tree, but it’s best, instead, to concentrate on overall values and colors instead. Start with the large shapes and concentrate on a few details at the end. After all, when we notice trees at all, we generally perceive them as masses, rather than as individual details. The exception is when someone is interacting with the tree, as in Mary Cassatt’s Child Picking a Fruit.
Isles of Spruce, silkscreen, c. 1943, Arthur Lismer. While the contrast between background and foreground is high, the values within individual trees are quite close.
How do we create form in trees? The same way we do with any other subject, by creating a pattern of light and dark. Our first question ought always be, “where is the light coming from?” The second question should be, “Is the light cool or warm?”
Start with a drawing. This is where you can get carried away with the gothic intricacies of the structure, and get them out of your system. Make sure that the height and width relationship is accurate. Also double-check that you have branches on all sides of the trunk, not just to the sides. Some will come directly towards you. While these are difficult to draw, they’re what anchor the tree in space.
Dusk, 1900, Isaac Levitan, courtesy State Tretyakov Gallery. Depending on the light, evergreens may be represented with no green at all.
I’ve written before about working with a green matrix; you can use it as successfully with evergreens as with deciduous trees. Let’s assume you’re drawing in early morning and the light is golden. Make the shadows cooler and darker and the highlights warm and light. It’s possible that the only true greens in your tree will be in the midtones or highlights. But avoid excessive value jumps; making the highlights too light can end in visual chaos. It’s usually what’s happened when someone complains that they’ve gotten lost in the detail.
Montreal River, c. 1920, Lawren S. Harris, courtesy McMichael Canadian Art Collection. The Group of Seven painters were interested in trees as screens.
Unless you’re painting a deciduous tree in the dead of winter, the branches and trunk are secondary to the masses of foliage. 
Your assignment this week is to paint an evergreen, either from life or a photograph. Before you start, find a masterpiece from one of the artists I’ve mentioned above, and study his paint application carefully. Try to emulate that in your painting.

Monday Morning Art School: Painting water

“Rivers are elemental and ambivalent. They are frontiers and highways, destroyers and fertilisers, fishing grounds and spiritual metaphors, power-givers and flushers of poisons.” (Derek Turner)

Port of Hamburg, Anders Zorn, watercolor, 1891, courtesy of Nationalmuseum, Sweden. Even in watercolor, Zorn goes for opacity and energy, not wispy translucency. 
It’s been said that we never stand in the same river twice. It is equally true that we never paint water the same way twice. There are as many answers to the question “how do you paint water?” as there are moments in the day. Water is as changeable as the sky. But there are still some general steps you can follow.
The purple noon’s transparent might, Arthur Streeton, 1896, courtesy National Gallery of Victoria. Streeton’s river is defined by value, and the depth of the painting by atmospheric perspective.
Start by noting the mechanics of the body of water in question. Is there a current? At what point is it in the tide cycle? What underwater obstacles are disrupting the surface? Is the surface smooth or choppy? Is the water silted or clear? What is it reflecting?
Water seeks a flat plane, but there are always light-and-dark contours.  The wind makes patterns on the surface. In watery depths are dark tones. The splash and movement of foam and surf are light and energetic. On a rocky headland, these may appear to be constantly shifting, but in fact they follow rhythmic rules. In rivers, standing waves may appear oddly immutable.  

Hudson River, Logging; Winslow Homer, watercolor, 1891-92, courtesy National Gallery of Art. The water is blocked in solid shapes of different values.
Just as you seek the contours in a still life or portrait, find them in the moving water. Mark them out, dark to light. It’s easy to get repetitive in this phase. Only by careful observation will you avoid that.
The grand canal of Venice (Blue Venice), Edouard Manet, 1875, courtesy Shelbourne Museum. It takes keen observation to paint the pattern of water without being dully repetitive.
Reflections always line up vertically with the object being reflected, but the length of reflections varies. This is liberating: if you get the widths right, you can be creative with the lengths. Generally, the valuesin reflections will be somewhat compressed; lights will be slightly darker than what’s being reflected, and the darks slightly lighter. But that doesn’t mean the chroma will be necessarily reduced—reflections can often surprise with their purity of color. And there’s no rule that says the ocean will be lightest at the horizon. The ocean does anything it wants.
San Cristoforo, San Michele, and Murano from the Fondamenta Nuove, Venice; Canaletto, 1722, courtesy Dallas Museum of Art. Even delicate Canaletto paints reflections more positively than simply dragging his brush through the verticals.
Depending on the surface of the water, a reflection can be mirror-like, or it can be in bands, or it can be almost lost in chop. But the overall scene won’t be a mirror image of what’s in the background. Mountains will appear farther away in the reflection. Observe what’s actually there, versus what you expect to see.
I usually block in reflections before I start worrying about the surface of the water. That lets me choose my markmaking at the last minute. It’s easy enough to build the reflections vertically and then drag a brush across them to give the sense of still water. But this is a party trick and can be overdone.
Falls, Montreal River, JEH MacDonald, 1920, courtesy Art Gallery of Ontario. It’s an unusual angle, looking down from the top, but we understand what we’re seeing because of the ferocity of MacDonald’s brushwork.
Instead, use brushwork to imply the vast energy of water. Long, fluent strokes can indicate ebb and flow. Short, energetic strokes will show chop. Opaque or impasto paint can indicate the dance and verve of crashing waves better than delicate transparency.
Lake Ladoga, Arkhip Kuindzhi, 1871, courtesy Russian Museum. We can see the underwater rocks along the shore.
Shallow water, where you can see to the bottom, is difficult to paint. The ground influences the color of the water, and you must balance underwater details with surface reflections. Shallow water running over rocks in a river can be very erratic; to get the sense of that requires careful, slow observation.
Your assignment this week is to paint water. If you’re lucky enough to live where you can paint outdoors without breaking your lockdown rules, please—by all means—avail yourself of that opportunity. For the rest of us (and those of you who are still locked down in winter) a photo is another option.
I can’t wait to see what you do!

Monday Morning Art School: working from your imagination

Lockdown is a good time to work from your inner landscape.
Heart of Darkness #1, monotype and pastel, by Carol L. Douglas
Today’s exercise is in converting words to images, and the text I’m giving you is the opening paragraphs of Joseph Conrad’s Heart of Darkness.
For your convenience, I’ve made a text file of these opening paragraphs, or you can read the whole novel on Project Gutenberg. This is a complex novel; it’s about madness and sanity, at once a condemnation of colonialism and yet conventional for its time in its racial views.
Conrad was a sailor in the French and British merchant navies, starting at the bottom and working his way up to Captain. He spent three years with a Belgian trading company running the steamer Le Roi des Belges on the Congo River, experiences which formed the basis of Heart of Darkness. Le Roi des Belges was, of course, King Leopold II of Belgium, then operating his infamous Congo Free State. Conrad met and befriended the humanitarian Roger Casement in the Congo. Both men initially thought that colonialism would be good for the Congo; both soon realized their error.
Heart of Darkness #2, monotype and pastel, by Carol L. Douglas
The opening scene of Heart of Darkness is serene, contrasting with the choking, awful mystery of the main story. “And this also,” says the narrator, “has been one of the dark places of the earth.”
A few years ago, I was experimenting with monotyping. I did three iterations of the opening passages of Heart of Darkness. In the end, none of them fully reflected what I thought I felt about sitting in the cockpit of a boat as darkness falls. I was imagining I’d make something more along the lines of James Abbott McNeill Whistler’s Nocturne: Blue and Silver – Cremorne Lights (1872). Yet I trust my subconscious, and Whistler’s nocturne doesn’t have the undercurrent of destruction that rides at anchor even at the beginning of the book.
How do you paint from a text without training as an illustrator? Read it and follow your feelings, not your rational mind. What about the text fascinates you? Twenty years ago, I was interested in the water and the blue light of dusk; today, I’d probably be more interested in the cast of characters assembled on deck.
Heart of Darkness #3, monotype and pastel, by Carol L. Douglas
Once you’ve read the text, without looking at anything else, start to sketch. Make a drawing from your own internal source material: your mind. Don’t worry whether you’re doing a good likeness or not; that can come later. Worry more that you have caught the sensation that the words invoke. Think about the interplay of imagery on the page, and the abstract arrangement of lights and darks. Facts are the least-important part of the process at this point.
When you have a sketch that feels right, you can then assemble some reference material online. Go lightly here. I could not, for example, draw the cockpit of a cruising yawl without looking at pictures of a cruising yawl. But don’t get too dependent on that reference material. Look at it, perhaps sketch it out to memorize it, and then put it away. Be subservient to your original idea, not to photos.
I chose this bit of literature because I like its watery imagery, but you can do this with any written text that strikes your fancy. I did a similar thing with Jerusalemwhile in quarantine in Argentina. The important thing is to find something that resonates with you now, and see where it leads you. I’m interested in seeing the results.

Monday Morning Art School: why this subject?

Create clear priorities and a compelling reason for people to engage with your painting.

Lobster fleet at Rockport Harbor, by Carol L. Douglas

With modern cameras, you can snap a view and think through why you liked it later, cropping and manipulating the photo to enhance the subject. When drawing, you have to set pencil to paper somewhere. Pause at that point, because it’s usually what interests you most about the subject or idea. Why have you chosen it? What first attracted your eye? It’s bound to be one of the following:
  • The subject matter;
  • Patterns of lights and darks;
  • Abstract shape(s);
  • Atmosphere, tonal values or lighting effects;
  • Beautiful line;
  • Color;
  • Symbolism.
Bracken Fern, by Carol L. Douglas.

By purposefully noting what you notice, you create clear priorities for your painting. This makes you less likely to include every detail. Not slavishly recording everything is one secret to becoming looser as a painter.

This is where a habit of sketching comes in. Imagine you’ve just stumbled down to Camden Harbor for the first time. It’s beautiful—and overwhelming. There are swank yachts and luxury cruisers cheek-by-jowl with old wooden schooners and family sailboats. How do you sort this into a pattern?
Tricky Mary in a Pea-Soup Fog, by Carol L. Douglas
You could take your camera and shoot a thousand images, intending to assemble them into a painting in the studio. That’s not likely to produce a great painting. Instead, sit down at a bench and sketch what interests you—not one drawing, but a series of quickies. Usually, you have more time than you realize, and it behooves you to do this in gentle stages. Getting the subject and composition right is the most important part of painting.
After you’ve had time to think with your fingers, you can return to the subject that most interested you, and reduce and reframe the subject into its basic elements.
What you’re looking for is a compelling reason for someone to want to engage with your painting. That is as varied as there are people, but certain things ought to be present:
  • Energy;
  • A pleasing pattern of light and dark;
  • A strong focal point, supported by line and contrast.

If they’re not, then go back to the drawing board before you touch paint to canvas. A weak composition is one thing that you can’t fix along the way.

Sea Fog, by Carol L. Douglas is available through Folly Cove Fine Art, Rockport, MA.

Sometimes, things happen in nature that are too quick to allow for this careful set-up. I occasionally chase them, and doing so has about a 50-50 chance of succeeding. Atmospheric effects are the easiest, because they cover the canvas. People are the most difficult.

When I’m smart, I do the chasing with pencil and paper and transfer my drawing to canvas. A few weeks ago I was down in the North End Shipyard with Ed Buonvecchio. The crew of the Stephen Taber took a break in the spring sunshine, seated on the spruce planks that line the shipyard. Beautiful and poetic, they’d have made my painting. But instead of drawing them, I went right to paint. The result was terrible. At my age, I should have known better.

Monday Morning Art School: why these specific paints?

All real-world limited palettes have gaps in them. Paired primaries work best.

The Athabasca River, by Carol L. Douglas
Savvy folk in the far north often reserve their peregrinations until March. That way, winter’s back is broken by the time they arrive back home. I knew that meant my current painting class would be scattering to the four winds soon. I had a neat little map of lessons laid out for them before they left town. Then my new grandson arrived early, and they didn’t get them in order. I’ll try to correct that here.
The three primary colors we learned in primary school are red, yellow and blue. Forget about any other color space you’ve learned about; they’re not relevant to painting.

Above are the three primary colors in subtractive color. This is the color space in which painters work, and it predates modern color theory. These three colors are the foundational building blocks on which all other colors are made.


Mention this to your nearest teenager, and he’s likely to pepper you with comments about other color systems. Ignore him. This is the color system in which pigments work.
Mix the primary colors in the first illustration with their neighbors and you end up with the secondary colors. A secondary color is always across the color wheel from a primary color.
Back in elementary school, we learned that if you mix a primary color with one adjacent to it, you get the secondary colors:
  • Green (blue and yellow)
  • Orange (yellow and red)
  • Purple (red and blue).

Importantly, a secondary color is always across the color wheel from a primary color. When you want to dull down (reduce the chroma) a color in a hurry, the fastest way to do it is to mix it with whatever’s sitting across the color wheel.
All blues are not created equal: the wavelengths of common painting blues, from Multispectral Imaging of Paintings in the Infrared to Detect and Map Blue Pigments, by John K. Delaney, Elizabeth Walmsley, Barbara H. Berrie, and Colin F. Fletcher, Scientific Examination of Art: Modern Techniques in Conservation and Analysis, the National Academies Press, 2005
All limited palettes are based on a simple red-blue-yellow color scheme. Unfortunately, in the real world, there are no pure paint pigments. They’re either warm or too cool, or they have overtones that muddy them up in certain mixes. This means that all real-world limited palettes have gaps in them, places you just can’t get to with the available pigments.
In practical terms, this can be useful to the beginning artist, as limited-palette paintings always feel integrated. That’s because they hit a limited range of notes. For the beginner, that avoids discordance, but it also means that he or she will never learn how to mix through the whole color universe.
The colors on my palette are a variation of primary colors. It’s the same principle, but there’s a warm and cool version of each of them.
This is why I use paired primaries on my palette. I have a warm and a cool blue, warm and cool red, and warm and cool yellow. This allows me to go almost anywhere on the color wheel without sacrificing chroma.
Why, then, do I have four more tones: yellow ochre, raw sienna and burnt sienna, and black? You don’t need these colors, actually; you can mix to get to any of these points. I use these iron-oxide pigments because they’re cheap and they make great modulators in places where white is inappropriate.
This allows you to go anywhere you want on the color wheel without sacrificing chroma (intensity).
All the colors on my color wheel are modern synthetic pigments (with the exception of the cadmium orange, which is a 19th century organic pigment). Conversely, the iron-oxide pigments are the most ancient pigments known to man. We know they’re not fugitive. Engraved ochre has been found that dates from around 75,000 years ago.

Monday Morning Art School: don’t buy ‘hues’

The imperfection of paint is what gives it its liveliness and depth, but it also makes mixing colors tricky.
Autumn, by Carol L. Douglas. This painting contains no reds. The red tones are a combination of cadmium orange and quinacridone magenta.

A “hue,” is made a blend of less-expensive pigments that mimics more expensive ones. There is nothing inherently wrong with these pigments, but they don’t behave the same as the more expensive ones, and you should at least know what you’re buying.
Generally speaking, there’s little to be gained by buying a hue mimicking a more expensive pigment. If you are comfortable painting with a hue, then learn what’s in it and mix it yourself. You always have the greatest flexibility by working with pure pigments (rather than mixes) out of the tube.
How do you know if something is a hue, not a true pigment? First, ‘hue’ is often in the name, as in ‘cadmium yellow hue’. But you should learn to read the paint tubes, too. I’ve spelled that out in How to read a paint tube. It’s information every painter should know.
Three blues that look similar out of the tube, but behave very differently. The ‘glaze’ on the left is the undertone. Courtesy Gamblin paints
A mass tone is the color a pigment is straight out of the tube, dense and unmixed with another color. No real-world pigment is a pure color. While two pigments may look the same to the naked eye, their behavior when mixed can be radically different.
Undertone is the color revealed when a paint is spread thin enough that light bounces back up from the substrate. Some pigments are fairly consistent when moving from mass tone to undertone. Others have significant color shifts. This is where painting with hues can lead to muddy mixes, because they will not behave the same way as the original pigment.
Ultramarine, Prussian and phthalo blue are colors that shift radically from mass tone to undertone. They’re all so dark out of the tube that their differences aren’t apparent to the naked eye. But dilute them, and you’ll find a wide range of blues. Luckily, they’re all inexpensive pigments, so they’re never mimicked.
But they can be used to make hues of other colors—particularly phthalo, which is often found in viridian hue. Real viridian green (PG18) is a moderately staining, moderately dark and moderately dull blueish green. Viridian hue is terrifically staining and powerfully bright, because of its phthalo component.
Cadmium Red Hue is usually made with napthol red and a little white. They mix very differently, which is why the hue is a bad substitute for the real pigment. Courtesy Gamblin paints.
Cadmium red hue is usually a naphthol red with a small amount of white added. Out of the tube, the two paints are very similar, but they mix very differently. There’s nothing wrong with naphthol red; it’s my red of choice, but it doesn’t behave much like its cadmium cousin.
Even paints with the same pigments can have different undertones depending on the manufacturer. That comes back to the imperfectability of pigments and their essential complexity.
A drawdown test showing a paint’s undertone. Courtesy Utrecht paints.
If you’re considering two different pigments, or thinking about switching brands, you can test them. It’s fast and easy. To see their mass tone, put a small dab of paint on a smooth white board or glass palette and draw it down with a knife, creating a uniform, solid stripe that completely obscures the painting surface.
To see the undertone, draw the samples down again so they are translucent. You should be able to see minute variations in the color, and in the covering power.
This old paint chart from my childhood explains tints, shades and tones. It’s so old, it’s from before they banned black. 😉
But to understand the behavior of each more fully, you need to make tints, tones and shades of each sample.
  • A tint is a color plus white.
  • A shade is a color plus black.
  • A tone is a color plus black and white.
Even when the mass tone appears quite similar, two close colors will act very differently when mixed. Their unique qualities of tinting strength, chroma, undertone and color temperature come into play here. But mixing paint with white or black immediately adds another layer of complexity. Different blacks and whites have their own undertones. Titanium white is cool. Zinc white is warmer, but it’s also brittle and thin, making it a bad choice for general painting. Ivory black is slightly warm.

Monday Morning Art School: ellipses with a recipe thrown in

Learn how to draw a pie plate, dish, cup, or vase. I’m throwing in my pie crust recipe, so you can learn to make a pie, too.

When drawing round objects, we have to look for the ellipses, which are just elongated circles. Ellipses have a horizontal and a vertical axis, and they’re always symmetrical (the same on each side) to these axes.
The red lines are the ellipse and its vertical and horizontal axes. The two sides of the axes are mirror images of each other, side to side and top to bottom.
This is always true. Even when a dish is canted on its side, the rule doesn’t change; it’s just that the axes are no longer vertical or horizontal to the viewer.
Same axes, just tipped.
As always, I started by taking basic measurements, this time of the ellipse that forms the inside rim of the pie plate. (My measurements won’t match what you see because of lens distortion.)
This was where I learned that I couldn’t balance a pie plate on the dashboard in my husband’s old minivan.
An ellipse isn’t pointed like a football and it isn’t a race-track oval, either.
It’s possible to draw it mathematically, but for sketching purposes, just draw a short flat line at each axis intersection and sketch the curve freehand from there.
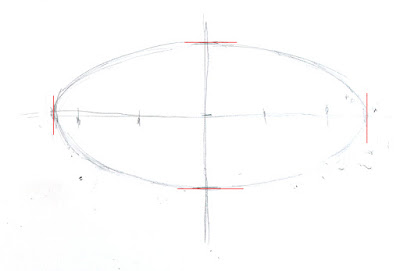
The inside rim of the bowl.

There are actually four different ellipses in this pie plate. For each one, I estimate where the horizontal axis and end points will be. The vertical axis is the same for all of them.

The horizontal axis for the bottom of the pie plate.

Next, I find the horizontal axis for the rim, and repeat with that. It’s the same idea over and over. Figure out what the height and width of each ellipse is, and draw a new horizontal axis for that ellipse. Then sketch in that ellipse.

Three of the four ellipses are in place.

Because of perspective, the outer edge of the rim is never on the same exact horizontal axis as the inner edge, but every ellipse is on the same vertical axis. We must observe, experiment, erase and redraw at times. Here all four ellipses are in place. Doesn’t look much like a pie plate yet, but it will.

Four ellipses stacked on the same vertical axis.

If I’d wanted, I could have divided the edge of the dish by quartering it with lines. I could have then drawn smaller and smaller units and gotten the fluted edges exactly proportional. But that isn’t important right now. Instead, I lightly sketched a few crossed lines to help me get the fluting about right. It’s starting to look a little more like a pie plate.

The suggestion of rays to set the fluted edges.

Now that you’ve tried this with a pie plate, you can practice with a bowl, a vase, a wine glass, or any other glass vessel.

Voila! A pie plate!

Meanwhile, here’s my pie-crust recipe. Nobody in their right mind would ask me to cook, but I can bake.

Double Pie Crust

2.5 cups all-purpose white flour, plus extra to roll out the crusts
2 tablespoons sugar
1 ¼ teaspoon salt
12 tablespoons lard, slightly above refrigerator temperature, cut into ½” cubes.
8 tablespoons butter, slightly above refrigerator temperature, cut into ½” cubes.
7 teaspoons ice water
Thoroughly blend the dry ingredients. (I use a food processor, but the process is the same if you’re cutting the fat in by hand.) Cut in the shortening (lard and butter) with either a pastry blender or by pulsing your food processor with the metal blade. It’s ready when it is the consistency of coarse corn meal. (If it’s smooth, you’ve overblended.) Sprinkle ice water over the top, then mix by hand until you can form a ball of dough. If the dough seems excessively dry, you can add another teaspoon of ice water, but don’t go nuts.
Divide that ball in two and flatten into disks. Wrap each disk in wax paper, toss the wrapped disks into a sealed container and refrigerate until you’re ready to use them.
Don’t worry if the dough appears to be incompletely mixed or the ball isn’t completely smooth; mine comes out best when it looks like bad skin.
Let the dough warm just slightly before you start to roll it out. And while you don’t want to smother the dough with flour when rolling, you need enough on both the top and the bottom of the crust that it doesn’t stick. If you’re doing this right, you should be able to roll the crust right up onto your rolling pin and unroll it into your pie plate with a neat flourish.
(If you’ve never rolled out a pie crust, watch this.)
I use this crust for single- or double-crusted, fruit and savory pies.

Monday Morning Art School: start with drawing

Before you can paint successfully, you have to learn to draw.
I love drawing in church, especially when there are sleepy teenagers. This drawing started with simple analysis of shape.

One of the problems with writing about ‘how to do art’ is that you’re speaking to all levels of experience. Today we’re going right to the beginning of measurement. Almost everyone can get the details of a drawing right. Where they go wrong is with overall proportion. Drawing is, first and foremost, a technical exercise in seeing size relationships. Get that right, and the details hardly matter.

All objects can be broken down into simple shapes and angles.

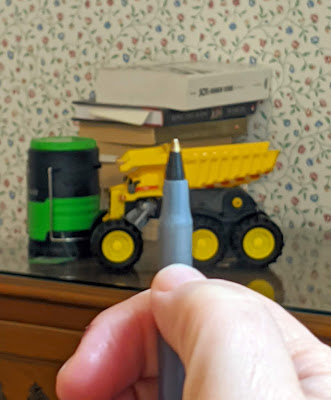
You’ve all seen artists holding a pencil up to an object. What they’re doing is rough measuring. It’s simple to do, but tough to photograph. Hold your pencil up like a ruler in front of the object you’re drawing. Move it around to see the relative height and width of the thing. For example, the toy truck below is about 1.5 times as wide as it is tall. Figure that out by holding your pencil first along the vertical access, then along the horizontal access, and comparing where the lengths stop along the pencil.

It’s not just an affectation; it’s really how artists measure.

A common beginner error is thinking that you have to transcribe the lengths exactly to the paper. The drawing can be any size you want. Start by figuring out how big you want the object to be on your paper, and make two hash marks to represent that. Then, if your object is half as wide as it is tall, figure out that relationship and mark it too.

Start by measuring out the simple shapes and angles.

You can also use your pencil to figure out the other important thing in drawing: the angles of lines. Formal perspective is important, but not as important as learning to see angles. If you develop the ability to see angles, you’ll have better natural perspective than if you try to fit up what you see to a theory.
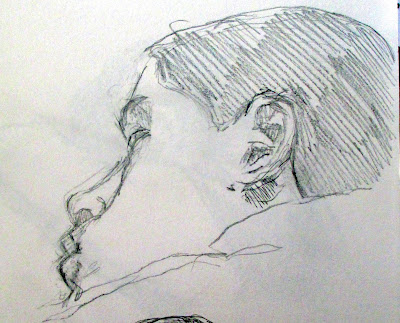
Next, rough in the values. That means the lights and darks.

Do your measuring with one eye closed, especially if you’re working in a tight space. Art books will tell you to measure with your arm straight out. That’s not always practical. Instead, try to have the pencil the same distance away from your eye each time you take a measurement. I do that by noting how my arm is cocked.

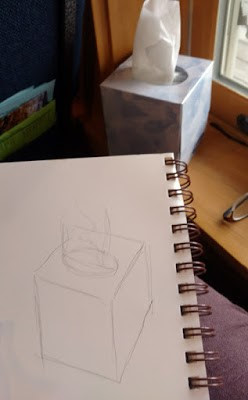
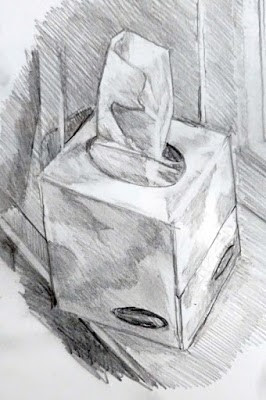
Today’s exercise is based on a tissue box I drew in church. It had lovely angles. However, what you see in the photo isn’t what I saw while working. A drawing from life will never match what the camera records. Cameras lie just as much as artists do.

Begin to refine and strengthen the light and dark shapes.

All drawing starts with simple shapes. After laying them down, I check and correct them. I do this by analyzing each large shape. Where does the back of the box intersect the tissue column? Is the curve of the cutout fat enough? I discovered that my cube wasn’t really tall enough, so I added some to the bottom. 

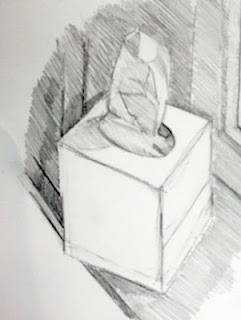
The next step is to establish some overall values.  “Value” just means how light or dark something is. This box was sitting on a south-facing windowsill behind a person who was casting another shadow. Thus, the window-frame behind the box was in deep shadow, but not nearly as dark as the photograph. I roughed in those darks first. They helped me know how to shade the box properly.

If you’re using graphite or charcoal, you can blend with your finger. Otherwise, use a stump, a tortillon, or a bit of rag.

Next, I set shadows on the tissue box itself. I am more concerned with the column of tissue, so with each pass, I spend more time on that.

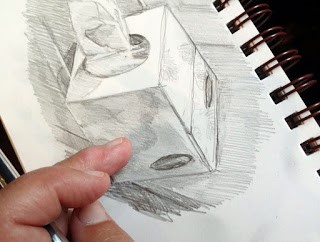
Finally, I did some blending, using the handiest tool I carry: my finger. You should use a stump or tortillon on work you care about, but in a pinch, your finger works great. But don’t blend pigments other than graphite or charcoal with your finger; they may contain toxic metals.

Voila! I have a tissue box drawn and my pastor is just winding down his peroration.
Note that I never bother much about my mark-making. It can take care of itself. I’m mostly interested in applying accurate values. I did this drawing with a mechanical pencil, which will never be as luscious as a good graphite stick, but it survives banging around in my purse week after week.
Some general rules:
  • Draw everyday objects. The better you get with these, the better you’ll be with complex subjects. There’s amazing beauty in everyday things.
  • Draw any time you get the chance. I did this drawing in church, and I didn’t miss a word. Drawing and language don’t use the same channels of your brain.
  • Measuring is the most important part of drawing. Keep checking and correcting sizes.
  • Start with big shapes and break them down into little shapes. If the big shapes are right, the smaller parts will slip into their spots just fine.
  • Value is relative. How dark something is, is only important in terms of how dark its neighbor is.
  • Constantly recheck shapes and values as you go.

Monday Morning Art School: how to draw an angel

Angels are devilishly difficult to draw, even though we all ‘know’ what they look like.
Choir of angels from the Ghent Altarpiece, early 15th century, by Jan van Eyck, courtesy Sint-Baafskathedraal, Ghent
The Bible is notorious for its lack of description when it comes to celestial beings. The Archangel Michael appears to Daniel and all the prophet can say is that Michael looked like a man. The angelic form also differs depending on context. Mostly, though, angels are spirit beings. You, the artist, have a lot of latitude in drawing them.
Still, we all ‘know’ what angels look like: they are infinitely sweet, sing in choirs, have wings and ringlets and wear white robes.
Wing of a European Roller, watercolor on vellum, 1510-12, Albrecht Dürer, courtesy of the AlbertinaVienna
The gap between the Biblical text and tradition has bedeviled artists through history. For example, who says that angels have to have bird wings? I’m not the first person to note this. Jan van Eyck gave the Archangel Gabriel fabulously iridescent wings in the Ghent Altarpiece, just like a bug. William Blake, that old curmudgeon, gave the angel of Revelation no wings at all.
Albrecht Dürer painted a dead European (blue) roller twice, meticulously observing its plumage and structure. His research paid off: his angels never suffer from static, limp wings.
Dead bluebird, watercolor on vellum, 1510-12, Albrecht /Dürer, courtesy of the Albertina, Vienna
If you try this at home, a turkey or chicken won’t do. The modern grocery store versions have had the flight bred out of them. A bird’s shoulders—or scapula—are actually part of its wings. In the wild, they’re strong and muscular. After all, most birdlife revolves around flight. If angels are to fly, their wings must be part of their structure, not just pinned on as in a Christmas play.
The Expulsion from Paradise, 1510, woodcut, Albrecht Dürer. He’d studied wings enough to know how the different coverts, or sets of feathers, move.
Human shoulders are adapted for operating our arms and hands. Winged angels must have two sets of scapula and the muscles to operate both. That’s hard to imply in a painting, but the best ones have the wings operating in parallel with the shoulders.
For most of art history, angels were depicted wearing the luxurious robes of the high princes of their day. The Renaissance artist often didn’t give a lot of consideration to tailoring wing-sleeves into these gowns. Sometimes they look as if the wings are sprouting from the drapery.  Leonardo da Vinci (as usual) had an ingenious solution in his Annunciation. The archangel Gabriel wears feathers around the base of his wing that echo the poufs of his sleeve. Tres chic!
The Annunciation, 1474, Leonardo da Vinci, courtesy the Uffizi Gallery
Angels were depicted in togas—the garb of ancient, pagan Rome—in the fifth century mosaic cycle of the Basilica di Santa Maria Maggiore in Rome. I particularly like the contrast with the hipsters in their modern dress at the bottom.
Angels in togas from the Basilica di Santa Maria Maggiore, Rome.
If you extend that to modern life, you’ll dress your angels in jeans and a t-shirt. These, however, can be unsatisfying to draw. Here is a quick lesson on drapery if you want to be traditional.
Halos were used in the iconography of many ancient people, including the Romans. Halos were adopted by early Christian artists to indicate that here was something worthy of veneration. The new naturalism of the Renaissance pretty much did away with them. If you want to add one to your angel, make sure you get your ellipse right by following the instructions here.
Song of the Angels, 1881, by William-Adolphe Bouguereau, courtesy of the Getty Center.
By the time William-Adolphe Bouguereau painted Song of the Angels in 1881, angels had been sanitized and softened, undergoing a gender transition in the process.
Historically, angels were depicted as male and terrifying. However, the paucity of description in Scripture allowed artists wide latitude. With the Enlightenment, angels became less frightening. This is when they began to transition into females in popular culture. (A classic case of a profession letting women in after its power has diminished.)
Worse, they started showing up as infants, in the form of putti.
Eastern Orthodox icon of a tetramorph cherub, depicting four essences in one being. Is there anything cute about this? 
Putti were originally meant to symbolize the profane passions of the pagan Romans. That’s why Cupid is frequently depicted as a winged boy. In the Baroque period, however, putti came to represent the omnipresence of God. Weirder, they became conflated with the Biblical cherubim. How cherubim—the fierce, serious beings that guarded the Garden of Eden—became fat little boys is one of the enduring mysteries of art.
This post first appeared last Christmas. I solemnly promise that my vacation ends after the new year, and I’ll be back with more art instruction, art history, and art criticism. Happy New Year, one and all!