fbpx

Monday Morning Art School: aspect ratio

When working big, start with a smaller sketch and grid it up. Itā€™s easy.
A large canvas transferred from a 9X12 sketch.
When you’re on the road, no two billets are the same. I was confident that I could use a tethered hotspot to write this morning’s blog, but then realized I’m in a cell-signal hole. So I’m reworking an earlier blog on aspect ratio. It’s especially important when transferring a field value sketch to your finished paper or canvas.
The largest I generally work is 60X60. This is too large to draw directly, as I canā€™t get far enough away to see the whole thing as Iā€™m drawing. When Iā€™m working this big, I always do a smaller sketch in oil or cartoon in graphite first. Then I scale it up. This prevents proportion distortion.
I have a projector, but I find that gridding is more accurate and takes less time.
I realize many artists are math-phobic, but there are times when an small bit of arithmetic can save  you a lot of work. I’ll try to make this painless.
The first step is to work out whether the aspect ratio of your sketch is the same as the canvas. This is the proportional relationship between height and width. If you’re cropping a value sketch, you want to be sure that the aspect ratio of your crop is the same as will be in the finished canvas.
Usually I grid in Photoshop because it’s faster and I can just delete the lines with a keystroke. But you can grid just as well with a pencil on your sketch.
Sometimes this is very obvious, such as a 9X12 sketch being the same aspect ratio as an 18X24 canvas. But sometimes, you’re starting with a peculiar little sketch drawn on the back of an envelope. You can use a trick you learned back in elementary school.
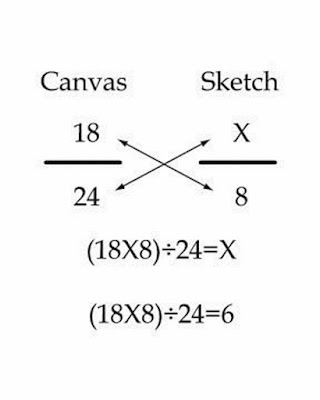
Remember learning that 1/2 was the same as 2/4? We want to force our sketch into a similar equivalent ratio with our canvas.
Letā€™s assume that youā€™ve cropped your sketch to be 8ā€ across. You want to know how tall your crop should be to match your canvas.
Write out the ratios of height to width as above.
To make them equivalent, you cross-multiply the two fixed numbers, and divide by the other fixed number, as below:
Use your common sense here. If it doesn’t look like they should be equal, you probably made a mistake. And you can work from a known height as easily as from a known width; it doesn’t matter if the variable is on the top or the bottom, the principle is the same.
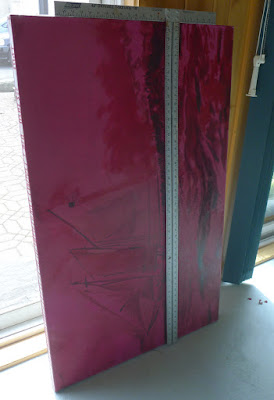
The next step is to grid both the canvas and sketch. You could spend a lot of time calculating the distances, but I prefer to just divide it in even amounts in each direction. I use a T-square and charcoal, and Iā€™m not crazy about the lines being perfect; I adjust constantly as I go.
The last step is to transfer the little drawing, square by square to the larger canvas. I generally do this in a dark neutral of burnt sienna and ultramarine. Itā€™s time-consuming, but with big paintings it saves a lot of work in the long run.
Monday Morning Art School: How to scale up a small sketch

When working big, start with a smaller sketch and grid it up. Itā€™s easy.

A large canvas transferred from a 9X12 sketch.
The largest I generally work is 60X60. This is too large to draw directly, as I canā€™t get far enough away to see the whole thing as Iā€™m drawing. When Iā€™m working this big, I always do a smaller sketch in oil or cartoon in graphite first. Then I scale it up. This prevents proportion distortion.
I have a projector, but I find that gridding is more accurate and takes less time.
I realize many artists are math-phobic, but there are times when an small bit of arithmetic can save  you a lot of work. I’ll try to make this painless.
The first step is to work out whether the aspect ratio of your sketch is the same as the canvas. This is the proportional relationship between height and width.
Usually I grid in Photoshop because it’s faster and I can just delete the lines with a keystroke. But you can grid just as well with a pencil on your sketch.
Sometimes this is very obvious, such as a 9X12 sketch being the same aspect ratio as an 18X24 canvas. But sometimes, you’re starting with a peculiar little sketch drawn on the back of an envelope. You can use a trick you learned back in elementary school.
Remember learning that 1/2 was the same as 2/4? We want to force our sketch into a similar equivalent ratio with our canvas.
Letā€™s assume that youā€™ve cropped your sketch to be 8ā€ across. You want to know how tall your crop should be to match your canvas.
Write out the ratios of height to width as above.
To make them equivalent, you cross-multiply the two fixed numbers, and divide by the other fixed number, as below:
Use your common sense here. If it doesn’t look like they should be equal, you probably made a mistake. And you can work from a known height as easily as from a known width; it doesn’t matter if the variable is on the top or the bottom, the principle is the same.
The next step is to grid both the canvas and sketch. You could spend a lot of time calculating the distances, but I prefer to just divide it in even amounts in each direction. I use a T-square and charcoal, and Iā€™m not crazy about the lines being perfect; I adjust constantly as I go.
The last step is to transfer the little drawing, square by square to the larger canvas. I generally do this with loose paint, in raw umber. Itā€™s time-consuming, but with big paintings it saves a lot of work in the long run.
(This was originally published on January 31, 2014 and was revised and updated for this post.)

Old subject, new technology

Yesterday I went all digital on a schooner. Allowing for the learning curve, this has potential.

Underpainting of American Eagle passing Owl’s Head, by Carol L Douglas
Iā€™ve toyed for a while with the idea of doing a large, Fitz Henry Lane-influenced scene of the American Eagle under sail. A large canvas of a boat in motion is not something you do en plein air, but the studies Iā€™ve done in harbor certainly influence it.
A student recently asked me if I like painting ā€˜just water.ā€™ I do, indeed, because to me thereā€™s no such thing as ā€˜just water.ā€™ Thereā€™s light, reflection, movement, the skipping of the wind, clouds, and promise. I showed him the wave study I did while cruising on the American Eagle last spring. That is the closest I get to a purely personal painting, one that has meaning for me and nobody else.
This field study of waves from last summer was the genesis of the painting above.
It was also the genesis of this larger idea. What better landform to use as a background than Owlā€™s Head, which sits just outside Rockland harbor, and where I paint many times every season?
When enlarging a sketch to a final composition, I generally use gridding, which Iā€™ve explained here.  Itā€™s laborious and time consuming. Itā€™s also extremely accurate and allows you to execute a pretty decent grisaille on the fly, depending on how much time you want to spend.
The horizon has to be straight on a nautical painting, or else the oceans will run dry.
My daughter gave us a cast-off video projector last year. Yesterday I decided to experiment with it. I havenā€™t used projection to enlarge a sketch since the demise of 35mm slides. 
These projectors are designed to shoot an image high on a wall, so they are set up to correct for the keystone effect, which is the distortion you get when you project an image at an angle. Once I managed to undo that correction, squaring the image was relatively easy. Making it exactly the size of my canvas was harder.
Level and square relentlessly.
I started with relentless leveling and squaring. The easel was perpendicular to the floor, the canvas leveled, the two lower corners the exact same distance to the projector. Even with all those preparations, the image was slightly canted. Fixing that took a lot of fussing.
From there, it was just a question of tracing the lines in the original sketch. However, my ability to see differences in value was vastly reduced.
I couldn’t see values but it was a neat optical effect.
Lest you think tracing is the answer to all your drawing problems, itā€™s still possible to make drafting errors. Note the slight sag in the bowsprit. Iā€™ll fix that in the next iteration.
With all my fussing, I was able to finish underpainting this 30X48 canvas in a single day. Thereā€™s promise there.
It’s anemic compared to my usual gridding, but I still think it has potential.
I tell my students to use a combination of ultramarine and burnt sienna for their initial drawing, but in practice I generally use leftover paint for this step. The exact color isnā€™t nearly as important as the value. Yesterday, I chose an old tube of Williamsburg Brown Pink. I donā€™t use this brand because I find the pigment load in the blues to be too low for my style. 
That wasnā€™t true with this color. This morning my whole studio is swimming in a butternut-colored haze. There is brown stain everywhereā€”creeping along the canvas, in my brushes, on my hands, possibly in my hair.

How to scale up a small sketch to a large painting

A large canvas transferred from a 9X12 sketch.
When working on a very large canvas in a normal-size room, I start with a smaller sketch (either in oil or graphite) and scale it up. There just isnā€™t enough space to stand back far enough to draw directly on the canvas.

I realize many artists are math-phobic, but there are times when an eensy-weensie bit of arithmetic can save  you a lot of work. I’ll try to make this painless.

The first step is to work out whether the aspect ratio of the sketch is the same as the canvas. This is the proportional relationship between height and width.
Usually I grid in Photoshop because it’s faster and I can just delete the lines with a keystroke. But you can grid just as well with a pencil on your sketch.
Sometimes this is very obvious, such as a 9X12 sketch being the same aspect ratio as an 18X24 canvas. But sometimes, you’re starting with a peculiar little sketch drawn on the back of an envelope or something. You can use a trick you learned back in elementary school.
Remember learning that Ā½ was the same as 2/4? We want to force our sketch into a similar equivalent ratio with our canvas.
Letā€™s assume that youā€™ve cropped your sketch to be 8ā€ across, and you want to know how tall your crop should be to match your canvas.
Write out the ratios of height to width as above.
To make them equivalent, you cross-multiply the two fixed numbers, and divide by the other fixed number, as below:
Use your common sense here. If it doesn’t look like they should be equal, you probably made a mistake. And you can work from a known height as easily as from a known width; it doesn’t matter if the variable is on the top or the bottom, the principle is the same.
The next step is to grid both the canvas and sketch. You could spend a lot of time calculating the distances, but I prefer to just divide it in quarters in each direction. I use a t-square and charcoal, and Iā€™m not crazy about the lines being perfect; I adjust constantly as I go.
This was gridded in eighths instead of quarters because I wanted to be sure I got the water in the bottom right in the correct spot. But usually, I just divide the canvas in quarters in each direction.
The last step is to transfer the little drawing, square by square to the larger canvas. I generally do this with loose paint, in raw umber. Itā€™s time-consuming, but with big paintings it saves a lot of work in the long run.

Let me know if youā€™re interested in painting with me in Maine in 2014 or Rochester at any time. Click here for more information on my Maine workshops!