fbpx

Monday Morning Art School: drawing a boat

This exercise is like learning perspective. You’ll never draw this way in the real world, but practicing it will improve your harborside skills.
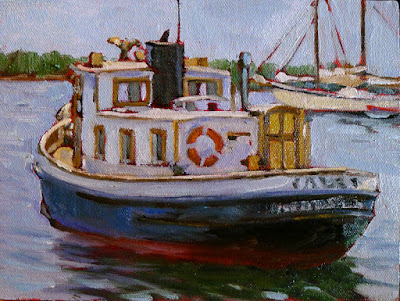
Cadet, by Carol L. Douglas

I tell my students that it’s best to paint a boat from the deck of another boat or a floating dock. If you can’t, then keep your distance. The tides in Rockport average about 12 feet. That means that if you stand on the public landing painting the lovely and graceful Heron, her angle is going to shift more than 20° over six hours. That’s an impossible perspective shift to manage.

There aren’t tides on lakes, obviously, but the waterline-view of a boat is still often the loveliest view.
Two figure eights. The top one is going to be stern-facing; the bottom one is going to be bow-facing. Thus the lines on the right are straight for the sides of the transom, curved for the bow. I made the bow loop slightly bigger because in practice the bow is likely to be higher.
I learned to draw boats based on figure eights. This is simple. You can master it in the studio before you go out to tackle the real thing. Since the bow of a boat is generally higher than the stern, I draw that end of the figure eight higher. The figure mustn’t be two circles, but you can make it as short or long as you wish. There’s no reason the two loops must be equal, although you should try it that way first. It’s easiest to do this when you’re not trying to be overly precise.
The fattest points of your figure eight are going to be the stern and bow of your boat. The keel curves in the front, so that line is drawn as a curve. The stern may curve in a fantail or be a flat transom. That varies by the boat.
The next step is to erase the extra lines and add a little shading. I took the liberty of adding a little extra height to the bow on the bottom.
In the top example, I put the transom forward; in the bottom drawing I put the bow forward. The important thing to realize is that the figure-eight is just like an optical illusion: it can go either way. Once I draw the curve or cut off the transom, I just erase the extra lines and gussy it up with some shadows. 
In the very old days, small boats were sometimes clinker-built, meaning they had overlapping planks that made for beautiful curving lines beloved of artists. If you see those planks on a modern boat, they’re molded. I halfheartedly faked them in on my drawing, because I no longer entirely believe in them.
The actual direction of the boat is like an optical illusion; it can flip either way. The Scrumpy’s notch is a little crooked; sorry.
Drawing boats like this is like drawing perspective. You need to know how to draw 2-point perspective but you’ll never really draw those rays on your canvas while you’re working. It’s an exercise that teaches you a principle that you then incorporate into your work.
Dinghy, by Carol L. Douglas, shows how fast that can be done in practice. This was a workshop demo.
The same with this kind of boat drawing. The take-away lesson is this: as long as you have the relative heights of the pieces of your boat right, it can swing on its anchor all afternoon without significantly messing up your painting. Block it in with initial measurements and let it go from there. The parts will stretch out or grow shorter, but their heights will always remain the same. 
Once you see it as a process of squeezing and lengthening the horizontal shapes while leaving the heights the same, drawing moving boats is easy.
That liberates you from worrying when your boat—as it will—wanders around its mooring. I did the little sketch above to demonstrate that.
This was first published on February 12, 2018, but some things bear repeating.

Monday Morning Art School: draw six different boats

Drawing six similar objects will teach you to observe details.
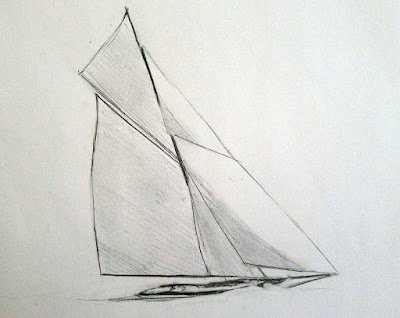
Reliant rigged as a sloop.

I once got a commission to paint Lazy Jack II in Camden Harbor. I was pretty happy with the results. As I finished, two deckhands from another boat stopped to look at it. Their eyes met. “You’ve got the…” one started. “It’s not important,” said the other, and they quickly walked away. I’ve never figured out what’s wrong in that painting, but I did realize that you can only fudge the details so far. The experts will find you out.

In the normal course of things, you’re not going to see many square-rigged vessels here in mid-coast Maine (although you could see USS Constitution if you drive down to Boston). You’ll see fore-and-aft rigs, where the sails run above the keel rather than perpendicular to it.
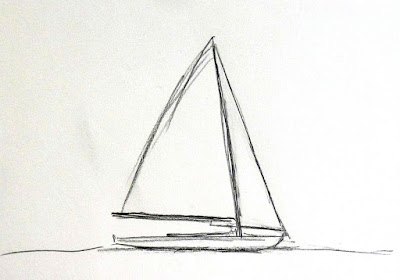
A Bermuda-rigged sloop. This is the most common silhouette you’ll see wherever pleasure boats congregate. 
A boat’s sails all suspend from a vertical spar called the mast. This transmits all the power of the wind pushing the boat through the water. It’s really a marvel of engineering, especially since the kinks were worked out before the age of composite materials. There are some other spars whose names will be useful to know: booms, which run along the bottom of the sails, and gaffs, which get raised up in the air. Not every sailboat has gaffs, but they all have at least one mast and boom to hold the sails taut.
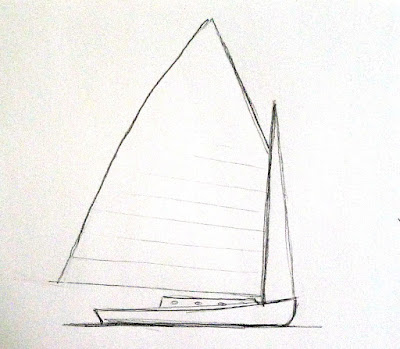
A gaff-rigged catboat.
A catboat is small and has a single sail on a single mast set well forward in the bow, or front of the boat. (I think this would be the perfect painter’s boat, especially if I could find one towable with my Prius.)
A sloop also has one mast, with only one sail in front of the mast. If that head-sail multiplies, your boat has morphed into a cutter. Reliance, the 1903 America’s Cup defender, could be rigged as either a sloop or cutter. I drew Reliance to illustrate that single-masted boats can be gaff-rigged as well as Bermuda-rigged. She was a peculiar thing, built only to win America’s Cup and then sold for scrap. Like all transitory things, she was, oh, so pretty.
A ketch. Angelique is far prettier.
Ketches and yawls have two masts, with the back (mizzen) sail smaller than the front sail. The difference is that in a ketch (like Angelique) the aft mast is meant to push. It’s pretty big. A yawl’s mizzen sail is very wee, almost vestigial, and is way to the back of the boat. It’s basically an air rudder, used to keep things in balance.
A yawl (or y’all, for those of you from the south).
Schooners started out having two masts, but three-masted schooners were introduced around 1800, and the spars proliferated from there. The only seven-masted schooner, the steel-hulled Thomas W. Lawson, was built in 1902. It was 395 ft. long.
While you might run across Victory Chimes, a three-masted schooner out of Rockland, the rest of the Maine windjammer fleet have two masts. A schooner’s forward mast is shorter than its mainmast, giving it an appearance of eagerness. Schooners come in all kinds of sail configurations.
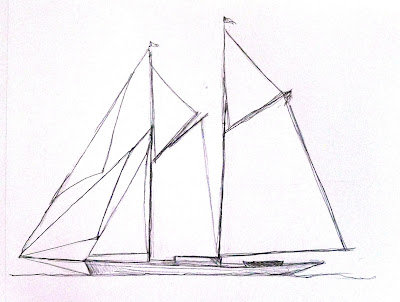
A schooner’s foremast is shorter than its mainmast.
Your assignment is to find a photo of each of these sailing vessels and sketch them out as I did, paying particular attention to where the sails attach to the masts, the angles at which the gaffs are running, and the height of the masts in relationship to the length of the hull. This is not about sailing, it’s about attention to the details that matter.
If you aren’t interested in boats, you can do the same exercise with cars, motorcycles, or varieties of apples; I don’t care what they are, just that you have six objects from the same class of objects. 
The point of this exercise is not to create six beautiful boat drawings. It is to show you how much you learn by sketching. At the end of it, you should have a clear sense of why sketching in the field is a far better preparation for painting than taking photos is.
Remember, those of you who love boats: we’ll be sailing with Captain John Foss on the most beautiful of all windjammers—American Eagle—in June, studying watercolor painting on the move. For more information, see here.
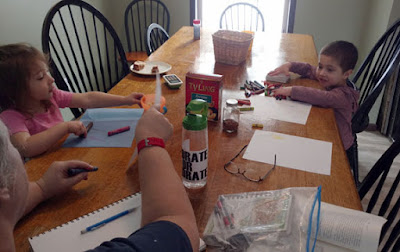
My little assistants. I drew the boats and they colored.

Monday Morning Art School: how to draw a boat

This exercise is like learning perspective. You’ll never draw this way in the real world, but practicing it will improve your harborside skills.
Cadet, by Carol L. Douglas
I tell my students that it’s best to paint a boat from the deck of another boat or a floating dock. If you can’t, then keep your distance. The tides in Rockport average about 12 feet. That means that if you stand on the public landing painting the lovely and graceful Heron, her angle is going to shift more than 20° over six hours. That’s an impossible perspective shift to manage.
There aren’t tides on lakes, obviously, but the waterline-view of a boat is still often the loveliest view.
Two figure eights. The top one is going to be stern-facing; the bottom one is going to be bow-facing. Thus the lines on the right are straight for the sides of the transom, curved for the bow. I made the bow loop slightly bigger because in practice the bow is likely to be higher.
I learned to draw boats based on figure eights. This is simple. You can master it in the studio before you go out to tackle the real thing. Since the bow of a boat is generally higher than the stern, I draw that end of the figure eight higher. The figure mustn’t be two circles, but you can make it as short or long as you wish. There’s no reason the two loops must be equal, although you should try it that way first. It’s easiest to do this when you’re not trying to be overly precise.
The fattest points of your figure eight are going to be the stern and bow of your boat. The keel curves in the front, so that line is drawn as a curve. The stern may curve in a fantail or be a flat transom. That varies by the boat.
The next step is to erase the extra lines and add a little shading. I took the liberty of adding a little extra height to the bow on the bottom.
In the top example, I put the transom forward; in the bottom drawing I put the bow forward. The important thing to realize is that the figure-eight is just like an optical illusion: it can go either way. Once I draw the curve or cut off the transom, I just erase the extra lines and gussy it up with some shadows. 
The actual direction of the boat is like an optical illusion; it can flip either way. The Scrumpy‘s notch is a little crooked; sorry.
In the very old days, small boats were sometimes clinker-built, meaning they had overlapping planks that made for beautiful curving lines beloved of artists. If you see those planks on a modern boat, they’re molded. I halfheartedly faked them in on my drawing, because I no longer entirely believe in them.
Dinghy, by Carol L. Douglas, shows how fast that can be done in practice. This was a workshop demo.
Drawing boats like this is like drawing perspective. You need to know how to draw 2-point perspective but you’ll never really draw those rays on your canvas while you’re working. It’s an exercise that teaches you a principle that you then incorporate into your work.
Once you see it as a process of squeezing and lengthening the horizontal shapes while leaving the heights the same, drawing boats is easy.
The same with this kind of boat drawing. The take-away lesson is this: as long as you have the relative heights of the pieces of your boat right, it can swing on its anchor all afternoon without significantly messing up your painting. Block it in with initial measurements and let it go from there. The parts will stretch out or grow shorter, but their heights will always remain the same. That liberates you from worrying when your boat—as it will—wanders around its mooring. I did the little sketch above to demonstrate that.