Have trouble drawing people? Here’s a way to get a good likeness in a hurry.
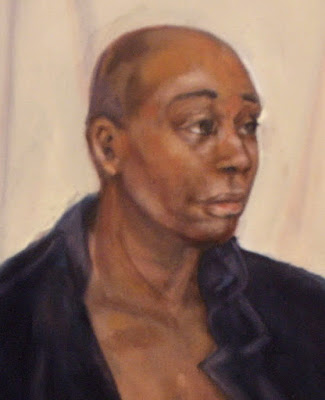 |
| Robbie, by Carol L. Douglas |
Most artists don’t have trouble drawing individual features. They run into trouble hooking all those parts up into a plausible whole. Sadly, a person’s likeness starts with the overall structure of their head, not with the details. This is a fast and easy way to measure features so you get them straight. The hardest part, I think, is that I’m showing you in words and pictures instead of in person. But if you take the time to practice it, your portrait drawings will improve.
I seldom work from photos, but I’m at the
Joseph A. Fiore Art Center this month. That means I can’t conscript any family members to model. Instead, I found this old photo of
Sandy Quang on my laptop. (It’s odd because she’s not laughing her fool head off.)
If you don’t remember the rudiments of measuring with a pencil, please brush up
here and
here before you start.
I start by drawing a line indicating the angle at which the head is cocked.
The second line goes right through the eyeballs. This is not absolutely perpendicular to the center line, but it’s usually close. Remember, you are measuring a 3-D object onto a 2-D surface. It’s easy to mistake these lines for a grid. They’re not; they’re just measurements.
From there, go on to measure the remaining distances as shown above. Eventually, you can add a line for the eyebrows and the bottom of the bottom lip, but I find them confusing at this early stage.
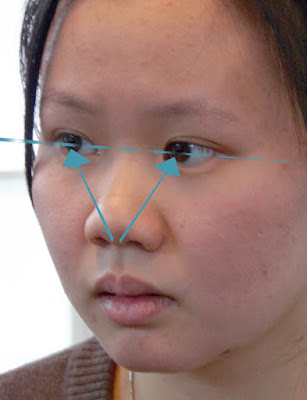 |
| The angle from the bottom of the nose to the pupils is the most important measurement in the face. Check, double check, and then place dots where it intersects with your eyeball line. |
Next, draw lines from the bottom of the nose through the center of the pupils. You should create a triangle from eyes to bottom of nose. That’s the most important measurement you’ll do, and the most confusing.
Why are we using an angle instead of straight measurements on the eyes? This is the most important dimension in a human face, and angles allow us to double-check our work. A triangle is a shape, and that’s just easier for the brain to process than a line. That’s why I use angles to measure whenever I can. (Brush up on angle-drawing
here.)
Unless the model is looking right at you, each eye is not the same distance from the center line. Check and double-check.
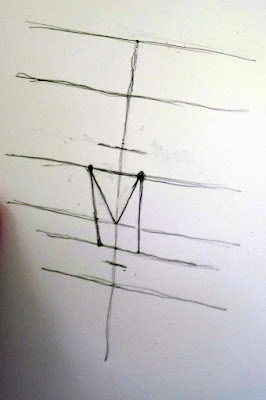 |
| This triangle is the most important measurement in the whole face. |
Then draw lines down from the center of the eyeballs to the corners of the mouth. In most people, the mouth is about as wide as the pupils of the eyes, but Sandy’s mouth is narrower than her eyes.
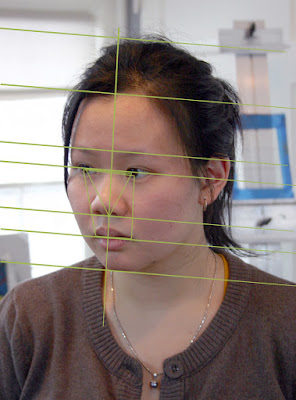 |
| I did the drawing freehand but added this because it’s so difficult to understand from just words. |
My last measurement is from the center line to outside of her ear. Conveniently, it’s about the same distance as from her hairline to the bottom of her nose. Remember, all measurements are relative. “It’s slightly less than two noses long,” is how we measure in drawing.
I managed to drop her ear too low at this point; I corrected it as I went. There are always fine corrections to be made. To me, that refinement is the best part of drawing. It’s like doing a puzzle.
Having made all those measurements, I was ready to rough in the overall features. I drew the nose and chin as volumes. (The angled line from the nose was to figure out my ear error.)
The drawing guides are superfluous after this point. Time to erase them and start having freehand fun.
Block in the mass of hair. Your eye perceives shapes and sizes differently depending on value and the color, as we
learned here. That dark shape is important.
Refine the features, erasing and redrawing as time allows.
Because I was working with a #2 pencil on a cheap sketchbook, I waited until the end to add the shadow masses. Otherwise, they’d smear.
 |
| Throwback Sandy, by Carol L. Douglas |
We are taught to draw the human face in ‘perfect’ terms: the eyes are halfway down the head, the tear ducts line up with the edges of the nostrils, the face is divided into thirds, etc., etc. In fact, human faces are infinitely varied.
These ‘perfect’ laws fall apart especially fast when the subject isn’t white. For example, everything you learned about drawing eyes falls apart with an Asian person with no epicanthic fold. It’s far better to start with what’s really there.
This is a system that works, but you’ll need to practice it a few times before it feels comfortable. If you have any questions, email me and I’ll try my best to answer them.


